Task guide / Steam Demo · September–October 2026
A practical start for your first Hull Rupture run
Start with an economy you can keep supplied, add turret coverage along the aliens’ approach, and expand for a module you can actually use. Recheck those three things after each wave. Use this preparation loop as you work toward the core run’s 20 waves; adapt purchases to the kits the run offers.
Updated 2026-10-29 · Steam Demo · September–October 2026
Follow these steps
On a returning save, re-enable the tutorial in General settings if the new Hull Construction step is missing. Then look at your available kits and identify the most immediate problem: resource supply, usable space or enemies reaching the Airlock. Deal with that problem before buying or building another unrelated module.
Read the economy in Info Mode before expanding. Check current production, available workers, energy and fuel. A new module adds weight and demand. If the ship already struggles to support its current factory, first fix the upstream or staffing constraint instead of adding more downstream capacity.
 Enlarge ↗
Use current income as a status check, then inspect the supplies that keep it running. After a wave, buy for the next constraint. Choose a turret-themed box if the approach is under-defended or a module-themed box if the economy needs help. Use what the selection offers; v0.10.12 improves kit variety but does not guarantee the exact item a rigid build order requires.
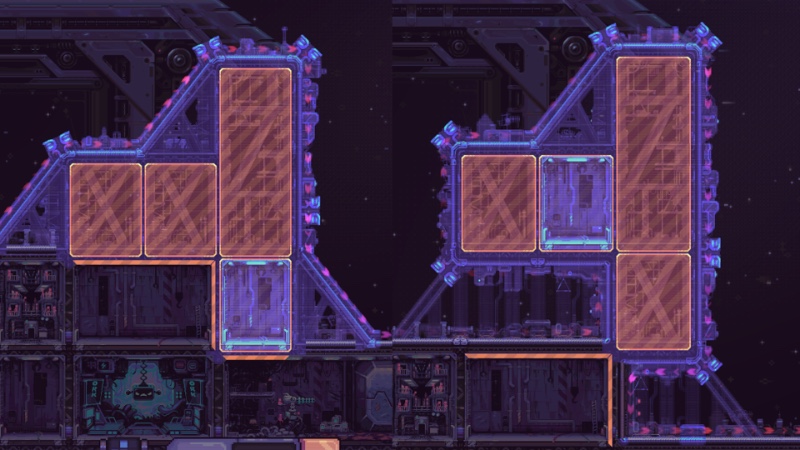
Add hull space when it serves the kit and the route together. Keep Airlock and Engine clear, account for a block that cannot rotate or be removed, and make the next slot adjacent to a completed module. A long detour can give guns more opportunity, but a spread-out factory makes the workforce travel farther.
 Enlarge ↗
A route-planning example. Keep both enemy travel and your crew’s travel in mind. Cover the route with turrets before treating Airlock units as your main plan. The September rebalance explicitly puts turrets first and units at the Airlock last. Use open corners for long-range guns and enclosed stretches for short-range guns. Relocate a misplaced turret between pressure points when possible; a move is slow and includes downtime.
Repeat a short check after each wave and before committing the next purchase. This is the suggested preparation order; it avoids assuming exact future kits, wave-by-wave enemy counts or a universal best layout.
Before the next wave Check A useful next decision Did aliens repeatedly reach the Airlock? Spend toward better approach coverage or a more useful firing position. Is a required input running out? Repair the input supply before expanding that production chain. Do you have a useful kit but no usable slot? Plan hull space and completed-module adjacency. Are you constantly refilling a converter by hand? Use Auto while watching the human supply. Is a weak gun using your best position? Move it instead of demolishing it if you want to keep the kit.
How to tell it worked
Before continuing, you can identify how the current economy stays supplied, which route the next attackers will take, and which turrets cover that approach. Each expansion or purchase addresses a visible weakness. Surviving all 20 waves still depends on the run’s choices and execution.
If it does not work
If the plan breaks, name the failing system first. A production stall needs an input/workforce check; a missing module needs a kit plan; a bad firing position needs the turret menu; an inaccessible slot needs an adjacency check. Use the corresponding guide instead of restarting around an unreceived kit.